Wednesday, April 29, 2015

How to install the custom fonts in Windows-8

I was wondering how to install the custom fonts to the Windows 8 OS. It’s pretty simple. Thought of sharing with you all.

      1.     First, just download and save the font file you want to install.

      2.     Now, Go to Control Panel and Select Fonts folder:


3.     Select “Font settings” in the left panel of the window


\

4.     Check the check box to allow to install the new fonts and click on OK button:


5.     Now go to the fonts file you have saved. Right click on it, you can see the option to install the font.


6.     Install the font. Now, you can open any editor like ms-word or word-pad, you can see this font in the list of fonts

That’s it.  Hope this is helpful

Monday, April 27, 2015

How to add custom fonts to the textview in android application

In Android, you can set your custom fonts to the textviews in your application.  When you want to use the different language fonts, it really helps. I was working on an android application for SRSM Mantralaya i.e. Panchanga application. That time we wanted to add the Kannada language support to the application. This was the solution I used and it worked well. You need to have the font file for the language or the fonts you want to use in the application. Generally this will be the .ttf file.

You need to place this font file in assets/font folder of the android application. After putting fonts in the assets folder under “font” folder, you can access it in your java code through Typeface class.

First, get the reference of the text view in the code. Its syntax is given below:


The next thing you need to do is to call static method of Typeface class createFromAsset() to get your custom font from assets. The syntax is given below:


Here the font_name is the name of the font file you copied to asset/font folder.
The last thing you need to do is to set this custom font object to your TextView Typeface property. You need to call setTypeface() method to do that. The  syntax is given below:


That’s it. Try it. Happy Coding.

Saturday, April 25, 2015

How to add background music to a website in html

Greetings Of The Day!!!

As I told you in my previous blog I was working on designing of a website for an Ashrama. They wanted a background music to play in the home page of the website. I was wondering how to do it as it has to play without any controls and should start automatically. It’s pretty simple to do it.

Here is the solution to implement a background music play in the website:

HomePage_Intro.mp3 is the file which is going to play in the back ground. You can replace it with your file name and also note that this should be available on the server. If it’s not there on the directory where the index file is there, you can give the full path of the music file. 


This works for most of the internet browsers except opera and older IE versions. For those we can use bgsound tag of HTML as below:


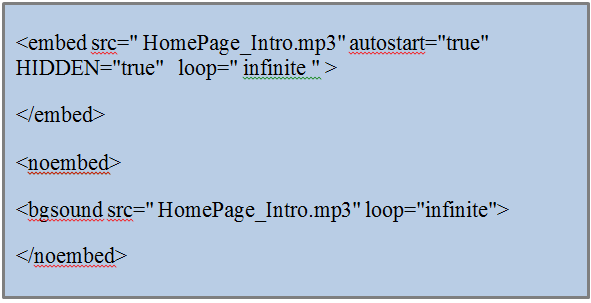
But the newer version of IE recognizes both the tags, hence if you add both to the code it leads to the problem of playing the music twice so to overcome this problem we have a workaround of keeping the bgsound tag inside noembed tag. So that browser does not interpret the second tag. Here is the code:


This code appears to be compatible with all versions of IE, Netscape and Opera.

Here in the above examples, I have hidden the music controls. But if you want to see the music controls, you can remove the Hidden tag and also you can give the width and height for the player as below:


We should be aware that background music that automatically starts playing when a web page is loaded may not be appreciated by a large number of the visitors. Some of them, when greeted with the sudden blaring of music from their speakers, may immediately hit the BACK button of their browsers. This may occur even if you're playing a piece of music that you think is well loved by everyone.
You need to remember that, there are people who browse the Internet in public libraries, surfing centres, at work, or in the dead of the night when others are asleep. Others may already have their favourite music playing on their computer speakers, and your auto-playing music file will only cause them to be annoyed. So it’s always better to give the controls for the players. 

Even if you are satisfied that your website has the type of target audience that will enjoy your background music, there are alternatives to automatically playing music that you might want to consider.  For example, giving visitors a link which they can click to play music would allow you to showcase your music while remaining sensitive to your visitors' preferences. Below is the code on how to accomplish this:


After clicking on the “Play music” link, the music can start playing in the background or even you can give the controls for the player to control the music.
That’s it. Hope this is helpful.


Friday, April 24, 2015

How To Upload Fonts to Your Server and Display Them on Websites

I was designing a website for an ashrama. They wanted the header to be displayed in Sanskrit. So I was looking for a solution and solved it with the below solution. This may be helpful to you so thought of sharing it. This is not only for Sanskrit font But for any of the customized font you can use this technique.

If we design a website using a font that only exists locally on your computer, then the visitors of this site won't see this font unless they also have the same font installed locally on their computer. In order to make the font appear to everyone, we must upload this font file to the web server. And we need to define this new font in the cascading style sheet(CSS).

It is assumed that you have the permission to use the fonts from the font creator and also you have permission to upload the files to the server. We need to have the permissions for the font before we use them on a public website. Otherwise we can create our own fonts using the FontForge or any other typesetting software.

Below are the steps to upload a new font to the server and embed it in the website:


  • Download the new font file and save this file to the desktop. If the file is compressed, extract it.
  • Generally the extracted file contains the .ttf  (true type font) or .eot (Embedded open type).
  • If we don;'t have .eot file, we can convert the ttf to eot also.  Because .ttf is compatible with google chrome, firefox, opera, safari and IE9. But  IE8 and below browsers we require .eot file.
  • Upload these font files to the "fonts" folder of the website. If it's not there you can uplaod it to any folder of the website. If we have more than one font used in the website it's always better to create the "fonts" folder for the easy access.
  • Now open the css of the website and add the below lines:  
        • @font-face {
          font-family: 'Font_Name';
          src: url(directory_path/newfont.ttf);
          }

          @font-face {
          font-family: 'Font_Name';
          src: url(directory_path/newfont.eot);
          }
  • You can the font weight and style and height also if you want 
        • font-weight:normal;
          font-style: normal
  • You can replace the actual name of font name in place of 'Font_Name' and the actual path of the font file in place of 'directory_path' also the actual .ttf and .eot file names.
That's all. Now I will tell you how you can use it in the web page. Below is the code you can use in the html file.

<           span style="color:#FFD700;font-family:'Font_Name';font-size:23px;">|| Om Sri Mahaganapathaye Namaha | |<        /span >

This will display the content with "Font_name" font. That's it. Hope this is useful. Happy coding.


Saturday, April 18, 2015

How to Create an Android trial application that expires after a fixed time period

When we start to develop any commercial android application, we may need to develop a trail application which runs on user device for a specific time and force the user to buy the application to use it further.

We can accomplish this using one of the below three techniques.

  1. The first technique can be easily implemented. When user runs the application first time, save the date and time to a preferred preference or a file or to the database. And every time user runs the application compare the current date and time to see if the trial period of the application has ended. if so, finish() or terminate the application.  But this technique can be easily broken by uninstalling and installing the application again. this allows the user to run the application for another trial period. 
  2. The second technique is hard to break. But still can be broken. In this technique we can hard code an end date for the trail.  All the users that download and use this application will stop being able to use the application at the same time. This technique is very easy to implement. User can break this technique by changing the date and time of the device manually. But I feel most of the user don't do this. But anyways this technique is breakable.
  3. Using the third technique, we can accomplish what we want. But this is bit tedious. And is the correct way of working for the trial application. This technique requires setting up of a web server and a database in the server. Whenever user starts the application, device should send the Phone Identification Number. To get the unique device identification number you can use the getDeviceId() of Telephony Manager.  And to send the data to the Server you can refer my old blog post "Syncing data to the Server". It's not the exact post. But you can refer that technique to send the data to the server.   Once the data is sent to the server, Server should check if there is an entry for that device using unique identifier. If not, it has to make a new entry with the current date and time.  If the server has an entry for this device then, it has to just do a simple check to see if the trail period has expired. It then communicates the result of the trial expiration check back to the application.  
         The check has to be done in the onCreate() of the main activity. If the trial period has expired then  application should pop up an Alert Dialog with a google play link to the full version or commercial version of the application.  Include OK button in the dialog, by clicking on it, it should call the finish() to end the application. 

Third approach is non breakable and the good to use. That's it. Happy coding.


Thursday, April 16, 2015

Syncing image/audio/video with parameters to the server in android

In any applications if you are working with a client server application, there is a high probability of syncing the images with some parameters to the server.
We have seen lot of examples to sync the text or parameters to the server and also the image or audio or video or any files to the server. You see these examples separately to send these data.  But not the combined data to the server.

Now, in this blog we are going to learn how we are going to send the the image and some parameters together to the server. Here the client is an android application and the server is apache with php and mysql (database).

We can consider the example of a register screen in the android application. Here I am not going to talk about the server set up, PHP and mysql configuration. It is assumed that the server setup and the PHP/Mysql configuration is done, up and running. Data base related to the registration parameters also ready. I am going to consider the First Name,  Last Name, Address, Mobile Number, Email, Gender and image of the candidate to be registered.

These data is captured from the mobile and sent to the server via PHP web service.  Here I am discuss about the code written from the client side. I am going to write that in a method "postdata"  It is assumed that we know the web service URL of the server to send the data.
define:
public final String Web_URL = "http://xxxx.com/xxxx_reg.php";

@Override
public string postdata() {
// Create a new HttpClient and Post Header
try {
 HttpClient httpclient = new DefaultHttpClient();
        HttpPost httppost = new HttpPost(Web_URL);
        HttpContext localContext = new BasicHttpContext();
/* Create a object for Mutipart Entity to send the data together
MultipartEntity multipartEntity = new MultipartEntity();
String path ="image_path"; //user has to enter his image path where the captured image is stored
File sourceFile = new File(path);
FileBody bin1 = new FileBody(sourceFile);
multipartEntity.addPart("uploaded_file", bin1);
multipartEntity.addPart("fName", "Jose");
multipartEntity.addPart("lName", "Pareria");
multipartEntity.addPart("address","#999, 2nd Main, 10th Block, Koramangala, Bangalore-10");
multipartEntity.addPart("mobile", "+919999999999");
multipartEntity.addPart("email", "abc@xyz.com");
multipartEntity.addPart("gender", "Male");
//Setting the Entity and executing
httppost.setEntity(multipartEntity);
HttpResponse response = httpclient.execute(httppost,localContext);
// Getting the Respose from the server
                  BufferedReader reader = new BufferedReader(new InputStreamReader(
response.getEntity().getContent(), "UTF-8"));
StringBuilder builder = new StringBuilder();
for (String line = null; (line = reader.readLine()) != null;) {
builder.append(line).append("\n");
}
String getData = builder.toString();
System.out.println(" data "+getData);
}catch (ClientProtocolException e) {
                 Log.w("Network Error",e.toString());
// TODO Auto-generated catch block
} catch (IOException e) {
// TODO Auto-generated catch block
Log.w("IO Exception",e.toString());
}
return "";
}
That's it. Try it out. Happy coding.

Wednesday, April 15, 2015

How to hide the virtual keypad by clicking outside of an EditText

There is the difference in the Keypad behavior between Android and IOS. When user clicks on Edit box, a virtual keypad pops up. But when we are done with the editing or to make this soft keyboard hide, we need to click on  "Done" or "Next" button of the keyboard or we need to click on the Back button of the Android in all the Android devices.

But in IOS devices, the behavior is different.  To make the keyboard hide, we can click on the screen of the phone anywhere outside the edit box.  In Android until and unless we click on done or next button or the back button keypad does not go away. This behavior of android is annoying if you are the adjusted to the use of IOS devices.

So when we were working on an android application, the customer asked us to make the behavior of the android keyboard same as that of IOS in the application. So here is the solution for this.

If you are using the edit box in an activity, you can use the below code snippet :

@Override
public boolean dispatchTouchEvent(MotionEvent event) {
View view = getCurrentFocus();
boolean ret = super.dispatchTouchEvent(event);

if (view instanceof EditText) {
    View w = getCurrentFocus();
    int scrcoords[] = new int[2];
    w.getLocationOnScreen(scrcoords);
    float x = event.getRawX() + w.getLeft() - scrcoords[0];
    float y = event.getRawY() + w.getTop() - scrcoords[1];

    if (event.getAction() == MotionEvent.ACTION_UP
&& (x < w.getLeft() || x >= w.getRight()
|| y < w.getTop() || y > w.getBottom()) ) {
        InputMethodManager imm = (InputMethodManager)getSystemService(Context.INPUT_METHOD_SERVICE);
        imm.hideSoftInputFromWindow(getWindow().getCurrentFocus().getWindowToken(), 0);
    }
}
return ret;

}


Override this method where you have the edit box in the activity. If we remove the coordinate checks, the keyboard does not come up next time when we click on the edit box.

Below is the code which actually does the trick:

InputMethodManager imm = (InputMethodManager)getSystemService(Context.INPUT_METHOD_SERVICE);
imm.hideSoftInputFromWindow(myEditText.getWindowToken(), 0);

We need to wrap it around the dispatchTouchEvent() as shown above.If you are using the edit box in the fragments, you need to add the above method in FragmentManager. That's all. All the best and happy coding. (y)